skip to main |
skip to sidebar
Google Fonts is a simple, popular and effective method of employing different and decorative fonts for the use on your blog. By using Google Fonts you do not need to stick with the limited font range that Blogger offers nor do you need to find a website to download fonts and furthermore find out how to use them for Blogger.
So firstly if you haven't before used or looked at Google Fonts click here and have a look around.
You will notice you can view the fonts as a word, sentence, paragraph or poster (the name of the font in the font), change the size, the order of viewing and use the filter to find specific types of font. Additionally you can customise the preview text which I find one of the most valuable tools. The sample preview Google Fonts give you is Grumpy wizards make toxic brew for the evil Queen and Jack which I assume will never be included on your blog. Thus preview a word/text that is particular to your blog, it helps.
Onto the tutorial...
When looking through the fonts when you have found one you like click the Add to Collection button for that font. Continue looking until you have added all of the fonts you want to include on your blog. Note: I suggest only adding the fonts you will use, whether one is for headings, one is for titles or your post text. In other words don't add 15 and only use 3.
The fonts will be added to your Collection panel. As you can see as an example I have added Kavoon and Flavors. Once you have collected all the fonts you wish to use click the Use button.
This will take to you a screen that looks like this. By scrolling down you will see more of the details and steps you need to take, but don't worry I'll talk you through it. See the Page Load symbol - the more fonts you have collected to use the higher the page load time will be.
Once you have chosen the styles you want in Step 1 scroll down to Step 3. Now in another tab open and log into Blogger. Click Template on the left side and click the Edit HTML button. Don't be frightened it is easy.
Hold the Ctrl and F buttons simultaneously to open the Search box. In the Search box type <head> and press Enter. This will locate the first <head> text found in your html code and highlight it as shown below.
Now switch to the Google Fonts tab and copy the code given to you in Step 3.
Switch back to your Blogger tab. You will add the code you just copied directly under the highlighted <head> text. See below. I have highlighted the copied and pasted code in pink for you to see.
There's just one more step to go. The fonts are now embedded into your blog code, you just need to specify what parts of your blog will be what font.
In the Search box type <b:skin> and press Enter. This will locate the first <b:skin> text found in your html code and highlight it as shown below. Click the little black arrow to expand.
Expanding the <b:skin> section of your html code will open the code that dictates most of your blog design. Now it's time to add the code/s in Step 4 of the Google Fonts tab where you want them.
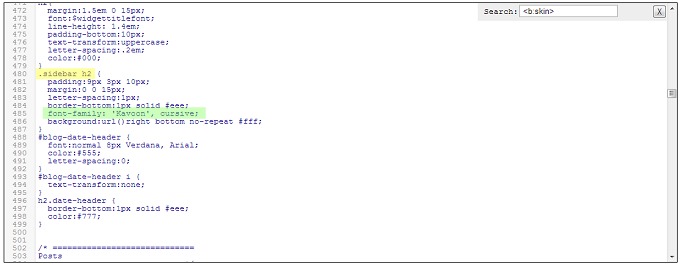
For example, if I wanted to use the Kavoon font for my sidebar headers I would find the code that dictates my sidebar headers. These names will vary from blog code to blog code so unfortunately there's no translation table. Below however is my example;
I have scrolled down to find the text translating to my sidebar headers highlighted in yellow and the text dictating what font my sidebar headers are highlighted in blue.
Then switching to the Google Fonts tab I will copy the code in Step 4 for the Kavoon font.
Switching back to my Blogger tab I would paste the code I just copied over the text highlighted in blue in the picture before.
My code would now look like this;
As you can see I've changed the type of font to the Google font of my choosing. Before pressing Save template I suggest you click Preview template to see if the font you changed actually represents the part of your blog you wanted to change. If it is than you are finished and can click Save template. If it wasn't just undo (Hold the Ctrl and Z buttons) until you erase the mistake.
I hope I have detailed the steps for your understanding as I know html can be overwhelming and/or tricky. If you have any questions or need help please don't hesitate to ask. You can leave a comment or email me privately - the choice is yours.
Happy blogging!
xox


0 comments:
Post a Comment
I love talking to you all and reading your comments. Don't forget you can tweet me (@MaddiSkotinis) if you have a particular question, I'll be able to reply much quicker. Thankyou so much for visiting, I hope you find the help you need to design your blog! xox
I reply to every comment directly to your email address. If by chance you have a no-reply email don't stress I'll also reply to your comment with a comment on this post, so if that's the case don't forget to check back.