skip to main |
skip to sidebar
I admit one of my favourite elements of designing my blog is using social media icons. I can sit for hours and look through beautiful designs and colours and still not make up my mind. In this post I will be showing you how to install social media icons to your blog.
Firstly, you will need to find a set of icons that take to your fancy, here I have compiled a resource post which includes some of my favourites (all free). You can also buy a set from Etsy - the majority are quite cheap or if you're a creative one you can make your own!
Anyhow, once you have your chosen icons saved to your computer you will need to upload them to a photo-sharing website - for this tutorial I have gone with Photobucket (simple and free to use).
Go to your blog and click 'Layout' on the left side of your screen. Now click the 'Add a Gadget' module and choose the 'HTML/Javascript' option. This will open a 'Configure HTML/Javascript' window. The 'Content' section is where you will be pasting your codes.
Now it is time to add some HTML codes. Don't worry I have made it easy as pie to understand. For each of your icons except your email icon you will copy the code below. This code is for social media icons with no hover effect.
<a href="YOUR WEBSITE URL"target="_blank"><img src="DIRECT URL OF IMAGE" width="60" /></a>
YOUR WEBSITE URL Replace this with the URL of the website you are linking to, for example I will link the twitter icon to my twitter URL which is https://twitter.com/MaddiSkotinis
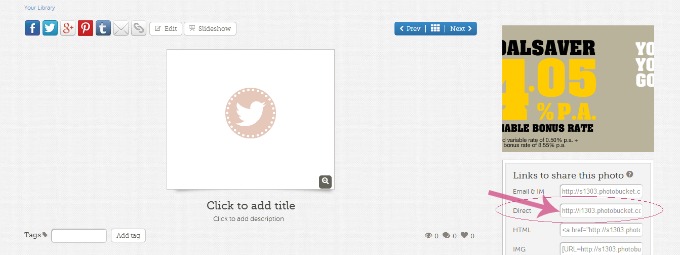
DIRECT URL OF IMAGE When you uploaded your icon/image to Photobucket click on the individual icon and you will be taken to a page that looks like this. Where it says Direct - click on that code and paste it where I have written DIRECT URL OF IMAGE.
width="60" Changing the number in purple will dictate how big/small your icon will be. I use this mainly to make the icons smaller if I add another icon to the row so they all fit. If they don't fit the next icon will automatically go underneath (creating a new row) which doesn't look bad either.
Congratulations your social media icons will now work. Use the same code for each icon but just make sure to change the URL address and Direct image URL for each icon. The code you will need for your email icon is this: this code is for email icons with no hover effect.
<a href="mailto:EMAIL ADDRESS"><img src="DIRECT URL OF IMAGE" width="60" /></a>
EMAIL ADDRESS Replace this with the email address you want to link to your email icon, for example my code would look like <a href="mailto:mskotinis1995@gmail.com">
DIRECT URL OF IMAGE Using the same method as before, when you uploaded your icon/image to Photobucket click on the individual icon and you will be taken to a page that looks like the one posted above. Where it says Direct - click on that code and paste it where I have written DIRECT URL OF IMAGE.
width="60" Again, changing the number in purple will dictate how big/small your icon will be.
Now if you would like your social media icons to have a hover effect use the codes below - a hover effect is when you place your mouse over the icon it will change colour. Some bloggers like this as it allows the visitor to be certain they are about to click on that particular icon. This code is for social media icons with a hover effect.
<a href="YOUR WEBSITE URL"target="_blank"><img src="DIRECT URL OF IMAGE" onmouseover="this.src='DIRECT URL OF SECOND IMAGE'" onmouseout="this.src='DIRECT URL OF IMAGE'" width="60" /></a>
As with the code for no hover effect you will insert the URL address, Direct image URL and the width number the same way. You will replace the DIRECT URL OF SECOND IMAGE with the Direct image URL of the image you want to appear when you hover over that icon.
The code for a hover effect for your email icon is:
<a href="mailto:EMAIL ADDRESS"><img src="DIRECT URL OF IMAGE" onmouseover="this.src='DIRECT URL OF SECOND IMAGE'" onmouseout="this.src='DIRECT URL OF IMAGE'" width="60" /></a>
If you would like your icons to have no spaces between them you will not include a space between the opening and closing tags. For example, your code for 3 no hover effect icons would look like this:
<a href="YOUR WEBSITE URL"target="_blank"><img src="DIRECT URL OF IMAGE" width="60" /></a><a href="YOUR WEBSITE URL"target="_blank"><img src="DIRECT URL OF IMAGE" width="60" /></a><a href="YOUR WEBSITE URL"target="_blank"><img src="DIRECT URL OF IMAGE" width="60" /></a>
If you would like a space between your icons you simply paste each code on a new line. For example, your code for 3 no hover effect icons would look like this:
<a href="YOUR WEBSITE URL"target="_blank"><img src="DIRECT URL OF IMAGE" width="60" /></a>
<a href="YOUR WEBSITE URL"target="_blank"><img src="DIRECT URL OF IMAGE" width="60" /></a>
<a href="YOUR WEBSITE URL"target="_blank"><img src="DIRECT URL OF IMAGE" width="60" /></a>
Another option you have is if you would like your icons centered. Thus no matter how many icons you have they will be aligned to the center of your sidebar/footer/etc. To do this you will add <center> before your code and </center> after your code. For example, your code for 3 no hover effect icons to be centered would look like this:
<center><a href="YOUR WEBSITE URL"target="_blank"><img src="DIRECT URL OF IMAGE" width="60" /></a><a href="YOUR WEBSITE URL"target="_blank"><img src="DIRECT URL OF IMAGE" width="60" /></a><a href="YOUR WEBSITE URL"target="_blank"><img src="DIRECT URL OF IMAGE" width="60" /></a></center>
Finally, when you are happy with the position, sizes and images for your social media icons click Save.
You can now move the HTML/Javascript module anywhere in your sidebar/footer or to anywhere you would like your social media icons to appear.
If you have any trouble or have any questions please feel free to leave a comment or you can tweet or email me. I hope you found the help you needed to install social media icons on your blogger blog.
Happy blogging!
xox


0 comments:
Post a Comment
I love talking to you all and reading your comments. Don't forget you can tweet me (@MaddiSkotinis) if you have a particular question, I'll be able to reply much quicker. Thankyou so much for visiting, I hope you find the help you need to design your blog! xox
I reply to every comment directly to your email address. If by chance you have a no-reply email don't stress I'll also reply to your comment with a comment on this post, so if that's the case don't forget to check back.